Wednesday, April 25, 2007

Oatmeal Cookies


I LOVE Subway's oatmeal cookies. Have you ever tried them? They are awesome--get one next time you eat lunch there (but don't look at how many calories they have; it's better to stay in the dark, trust me). I love them so much that I even tried to find the recipe on the internet but no luck. I did hear in my travels that the recipe on the bottom of the lid of the Quaker oat box was pretty hard to beat, so I decided to try it. It's really good, and I'm only sorry I didn't make them sooner (ignore the fact that this is not a very good picture because they really tasted good). I made half the batch with rasins, and the other half with chocolate chips. I was afraid the chips might not go with the cinnamon that is in the recipe and that I'd have to cut it out next time if I wanted chocolate chips, but it was fine--both versions tasted great. However, I now know why the Subway cookies are so bad for you--the recipe calls for two sticks of butter. I'm thinking of trying it next time with 1 stick of butter and the rest applesauce to see what happens.

Oatmeal Rasin Cookies
1 C (2 sticks) margarine or butter, softened
1 C firmly packed brown sugar
1/2 C granulated sugar
2 eggs
1 tsp. vanilla
1 1/2 C all purpose flour
1 tsp. baking soda
1 tsp. cinnamon
1/2 tsp. salt (optional) (**I put in a little less than 1/2 tsp.**)
3 C Quaker Oates (quick or old fashioned, uncooked)
1 C rasins (or semi-sweet chocolate chips)

1. Heat oven to 350 degrees
2. Beat together margarine and sugars until creamy
3. Add eggs and vanilla; beat well
4. Add combined flour, baking soda, cinnamon and salt; mix well
5. Stir in oats and rasins (or chips); mix well
6. Drop by rounded tablespoonfuls onto ungreased cookie sheet
7. Bake 10-12 minutes or until golden brown
8. Cool 1 minute on cookie sheet; remove to wire rack (**don't forget this step or the cookie will totally fall apart on you**)

Yields about 4 dozen

Wednesday, April 18, 2007

Corn Bread


I should have been born a southerner because I love corn bread. All these years I've made my 'home made' corn bread by dumping a box of Jiffy mix into a bowl and adding milk and an egg. When I found this recipe for corn bread and discovered it's only a bit more work than opening a box, I turned my back on Jiffy forever (but we can still be friends, 'kay?)


Here is my modified version of this corn bread recipe. I cut out some of the sugar and used unsweetened applesauce instead of oil which worked great--neither my husband or I could tell the difference.


Corn Bread

1 C all-purpose flour
1 C yellow cornmeal
1/3 C sugar
1/2 tsp. salt
3 1/2 tsp. baking powder
1 egg
1 C milk
1/3 C unsweetened apple sauce

Preheat oven to 400 degrees. Spray or grease a 9 inch round cake pan

In a large bowl combine all dry ingredients; stir in egg, milk and applesauce until well combined. Pour into pan and bake 20-25 minutes or until a toothpick comes out clean.

Thursday, April 12, 2007

Happy Spring Cake


I made a cake for our Easter company that I like to think of as a "happy spring cake." It is decorated with all sorts of brightly colored gumpaste flowers (guaranteed to give your toddler hyperactivity and cavities) and a lovely basket weave design to make it look, well, like a basket.

You see, we are in desperate need of these little reminders of spring because in these parts spring is very late. Way past fashionably late, we are left wondering if it's going to come at all. We had snow yesterday--snow!--and everyone is cold, grumpy and miserable. However, a super sugary sweet concoction always helps to make things a little better. Especially if it has chocolate in it.

So, last weekend I decided to drag out my cake decorating supplies and how to books. I had never made any flowers with royal icing (only took the basic decorating class) but I figured I'd give it a try because they would look pretty on top of a cake.

Well, they do look pretty, but they are a huge pain in the ass to make. The good part is that once you make about a billion gumpaste flowers, they dry hard like candy and will keep a long time as long as they are kept in an airtight container.


This entire process (making numerous batches of two different kinds of icing, the cake, the flowers) ended up being an all day affair; of course, I had estimated it to be a 2 hour our so job. Luckily my husband understands that from time to time, I will get involved in these huge creative projects that always take about 4x's more time and effort than I estimate ("I should have this done in an hour!") and dirty every bowl and utensil in the kitchen (have I mentioned I cook, he cleans?)

He also had the task of trying to distract my son when he repeated the word "cake" over and over for about 20 minutes straight ("cake.cake.cake.cake.cake.cake") in an effort to convince me to give him cake for dinner. He is a very patient man, my husband. However, he also gets to reap the rewards of the finished product, so it's not all bad.

If you're interested in learning a few basic techniques of cake decorating, sign up for a Wilton Cake Decorating I class at Hobby Lobby. It's only 4 or 5 classes and if you hit it right, you can often take the class for 1/2 off if they're running a special.

Tuesday, April 10, 2007

Thai Beef Curry in Peanut Sauce


If I didn't happen to live in the middle of nowhere, I never would have attempted to make my own Thai food. I mean, why bother if you live near even ONE good Thai place? It's much more fun to eat it out in my opinion. But since the nearest Thai restaurant is an hour away I figured I had nothing to lose.

At first glance this recipe might seem too complicated due to some of the exotic ingredients, but once you buy them you are good to go for many meals. It is actually quite easy to put together (I slice the meat up ahead of time so all I have to do is throw it in the pot) and if you own a rice maker, it's really a breeze. Even though it calls for beef I think you could easily substitute any meat, seafood or tofu, since the star of this dish is the curry sauce.

I have made this recipe twice now; once with fresh lemon grass stalks I bought at an Asian grocery, and once with lemon grass paste I bought at Hy Vee supermarket. I couldn't tell the difference personally, and since the lemon grass in the tube will stay good for a while I think that's what I'll stick with.


Thai Beef Curry in Peanut Sauce

Serves four to six

2 1/2 C coconut milk
3T Thai red curry paste
3T Thai fish sauce
2T light brown sugar
2 lemon grass stalks, bruised (or 1 tsp lemon grass paste)
3/4 C ground roasted peanuts
2 fresh red chillies, sliced (I omitted)
5 kaffir lime leaves, torn (I omitted and instead served with a lime wedge)
1lb rump (round) steak cut into thin strips
2 salted duck eggs cut into wedges for garnish (obviously omitted this too)
6-10 sprigs of Thai basil leaves for garnish (I used regular basil)

1. Pour half the coconut milk into a large, heavy pan. Place over a medium heat and bring to a boil, stirring constantly until the milk separates.

2. Stir in the red curry paste and cook for 2-3 minutes until the mixture is fragrant and thoroughly blended. Add the fish sauce, sugar and bruised lemon grass stalks. Mix well

3. Continue to cook until the color deepens. Gradually add the remaining coconut milk, stirring constantly. Bring back to the boil.

4. Add the beef and peanuts. Cook, stirring constantly, for 8-10 minutes, or until most of the liquid has evaporated. Add the chillies and lime leaves. Season to taste (I never add salt or pepper and it tastes fine since the fish sauce is salty). Serve garnished with wedges of salted duck eggs and Thai basil leaves over rice.

Thursday, April 5, 2007

Asparagus and Dill Frittata


Frittata! Doesn't that word just scream out for an exclamation point?

You know the phenomenon when you have never heard of a particular word, phrase, person, and then you hear it once and it seems to be everywhere you go for the next few days/weeks? Well, I had that experience with frittata. I had never heard of a frittata (call me unenlightened) and didn't know what it was until I saw a cooking show featuring a fritatta last week. I then in very rapid succession came across frittata recipes on the internet, t.v., etc. Everywhere I looked, there was the frittata staring back at me. Very strange. When I found a recipe for mini asparagus frittatas I decided to transpose it to a regular frittata and make it for dinner last friday. It's the perfect meal for a lent friday since you can put anything you want in it, much like an omlette, and since I *heart* asparagus, I had to try it. Since it is a cheap, fast and easy meal, I look forward to experimenting with all kinds of frittatas.


Asparagus and Dill Frittata
1/2 C ricotta
1/2 C feta (since feta is salty, I did not add any extra salt)
1 T fresh dill, minced
1 T fresh chives, minced
5 eggs
2 egg whites
1/2 onion sliced in very thin strips
1/2 bunch asparagus cut into 1 inch pieces (or more if you really like asparagus)
1 T butter
splash of olive oil

Tip: Before cutting the asparagus, hold the spear in the middle and on the tail end and gently bend the spear. It will snap off the toughest part of the end of the spear which you want to discard.

Place a nonstick oven proof skillet on medium heat and melt the butter with the olive oil. Add the asparagus and onions and saute until onions are browned and somewhat caramelized. Whisk the eggs together in a bowl. Dump the cheese, dill and chives into the pan with the asparagus and onions, and immediately dump the beaten eggs on top. Stir with a rubber spatula like you would scrambled eggs until eggs start to set. Let the eggs cook undisturbed until all but the top is cooked (it should look runny and wobbly). Turn on the broiler; place the skillet in the oven and broil 3 minutes or until the top is set and golden brown.

If you are eating this as a one dish meal, it will serve 2-4. Two if you are me and my husband...oink oink.

Wednesday, March 28, 2007

BBQ Beef Sandwiches


Isn't it nice when a recipe that tastes really good also happens to be very healthy too? I'm not much on searching for excellent low-fat, low-calorie recipes. If I happen to run across one that looks good to me, then great--I'll try it out. But I'm not going to go out of my way to find them. There's just too many other wonderful recipes with things like real butter, or cheese, or chocolate in them calling me, tempting me with their fatty goodness. What is the good of avoiding takeouts and boxed and canned foods if you can't live it up a little in the foods you make yourself?

I tried this recipe because it looked good and it is. It's a weight watchers recipe, but as usual by the time I get done doubling the sauce and adding extra KC Masterpiece sauce on the finished product, it no longer resembles anything dietetic. I also use pork loin rather than beef, but I think that's a push calorie-wise. It's the other white meat, right?

BBQ Beef 7.5 points
2 1/2 lb. lean boneless chuck roast
1/4 C tomato ketchup
1 T Dijon style mustard
2 T brown sugar
1 garlic clove, minced or crushed
2 T red wine vinegar
1/4 tsp. liquid smoke flavoring
1/4 tsp. salt
1/8 tsp. pepper
10 French rolls or sandwich buns

Place meat in a slow cooker. Combine remaining ingredients, except rolls (duh). Pour over meat. Cover and cook on LOW 8 to 9 hours (I don't usually cook it this long). Shred meat by pulling it apart with 2 forks. Place on buns and top with leftover sauce if desired. Serves 10-12 (or if you eat like me and my husband, serves 6)

Spicy Garlic Lime Chicken


We eat a lot of chicken in my family (or as my son calls it: "bock bock") so I am always on the lookout for a new way to dress up an old standby. I found this recipe about a year ago on allrecipes and just love it. It's simple, yet you get a lot of bang for your buck, which is probably why it became so popular on a food chat board I frequent. I made this chicken a few days ago to use in quesadillas and it was great; it really spiced them up nicely.

I actually make up the spice mixture ahead of time and store it in a little snack baggie so when it's time to make it, I am ready to go.

Spicy Garlic Lime Chicken

Spice Mix
3/4 tsp. salt
1/4 tsp. black pepper
1/4 tsp. cayenne pepper
1/8 tsp. paprika
1/4 tsp. garlic powder
1/8 tsp. onion powder
1/4 tsp. dried thyme
1/4 tsp. dried parsley

4 boneless, skinless chicken breast halves (if the halves are too thick I just butterfly them again to cut down on cooking time)

2 T butter
1 T olive oil
2 tsp. garlic powder
3 T lime juice

1. In a small bowl mix together the 'spice mix' spices. Sprinkle generously on both sides of chicken breasts.
2. Heat butter and olive oil in a heavy skillet over medium heat. Saute chicken until golden brown, about 6 minutes on each side. Sprinkle with 2 teaspoons of garlic powder and lime juice. Cook 5 minutes, stirring frequently to coat evenly with sauce.

Thursday, March 22, 2007

Corned Beef


Even though we are only a "wee" bit Irish on my mom's side (she's a 1/4, I'm an 1/8) she always made corned beef and cabbage on St. Patrick's Day. Since our monthly dinner club was meeting on the 17th and it was my turn to host, how could I not make the theme 'Irish'? Yes, I know, the Irish aren't exactly known for their fine cuisine, but you'd be surprised how washing the food down with a few Guinness really enhances the flavor.

The two things I always hated about corned beef was the fattiness, and the saltiness. A little fat is ok for flavor, but big chunks of it that you have to hack away at to get to the meat? Yah, no thanks. And being kept up all night due to a vicious cycle of drinking water due to insane thirst only to have to pee it out an our later...not much fun. I decided corning my own beef was the only way around these dilemmas and I have to say it was worth it. Even better, it wasn't even hard.

Due to my inability to read directions completely the first (or even second) time, I failed to notice this recipe calls for curing the meat for 5-7 days. Not a good thing to realize at 2pm on Friday the 16th. Luckily, it didn't matter; the brisket still had a wonderful flavor.

The recipe called for a point cut, but I used a flat cut because they are leaner. I am glad I did, because I still had to trim off a ton of excess fat (sorry for the visual).

Unfortunately I did not take pictures (too hard when you're trying to coordinate a dinner for guests). Oh, and the leftover corned beef made excellent Reuben sandwiches. I'm too embarrassed to tell you how many I ate. Ok, we ate them for dinner the next night, lunch the next day, and then dinner again the next night. I'd be eating one right now if there were any meat left, but sadly it is all gone.

Corned Beef
1/2 C kosher salt
1 T black peppercorns, cracked
3/4 T ground allspice
1 T dried thyme
1/2 T paprika
2 bay leaves, crumbled
1 beef brisket, fresh, 4-6 lbs, flat cut, trimmed of excess fat (leave a bit attached for better texture and flavor), rinsed and patted dry (6lbs fed 7 adults plus leftovers)

1. Mix salt and seasonings in a small bowl
2. Spear brisket about 30 times with a meat fork. Rub each side with salt mixture; place in a 2 gallon size zipperlock bag, forcing out as much air as possible. Place in a pan large enough to hold it (like a jelly roll pan), cover with second, similar size pan, and weight with 2 bricks or heavy cans of similar weight. Refrigerate 5-7 days, turning once a day.
3. When ready to cook brisket, rinse and pat dry. Place brisket in a large stockpot and cover with water to 1-2 inches above meat. Bring water to a boil and then reduce to simmer; cover and cook 4-5 hours, skimming scum off the top as it cooks. Add chopped veggies of choice (onions, carrots, parsnips) and heads of cabbage cut into 4 wedges the last 15 minutes of cook time and cook until tender. Cut meat across the grain and serve on a platter with veggies placed around the sides. Serve the cabbage wedges in separate bowls topped with malt vinegar.

**if you need to keep the meat warm while you attend to other things, place the cut meat on a platter with 1 cup of the cooking broth spread on top; cover with tin foil and place in oven set to 200.

Leftover Reuben Sandwiches

1 loaf good rye bread
Thousand Island Dressing
1 can sour kraut
2 slices of sliced swiss cheese per sandwich
leftover corned beef--amount to your liking
butter to spread on bread

To make 2 sandwiches:

1. Place a non stick pan on medium high heat.
2. Butter two slices of bread, and put them butter side down in the pan. Place 2 slices of swiss cheese on top of each piece of bread and cook until mostly melted (you may have to put the lid on the pan to help this process along)
3. Meanwhile, lightly heat up the meat for the sandwiches in the microwave for 20-30 seconds
3. When cheese is mostly melted, place about 1/4 C of sour kraut on top of the bread, drained of juice.
4. Top with meat and a second piece of buttered bread, butter side up.
5. Flip sandwich over and cook until the bread is golden and crispy
6. When sandwich is finished cooking, put the Thousand Island dressing on the inside of the sandwich to your liking as you would any condiment.

Tuesday, March 20, 2007

Bleh

Last week I came down with a stomachy thing thanks to the germ factory I send my son to known as 'daycare'. What a weird bug. I never did throw up, but I felt awful and got a very strong urge to throw out all the contents of my 'fridge--yet I still felt hungry. If that isn't the definition of being in hell, I don't know what is.

Thus, the cooking duties (i.e. the making of pancakes and reheating of leftovers) were relegated to my husband for most of last week. I did feel well enough to make a home made corned beef on Saturday, so I will share that tomorrow--it was fantastic.

Tuesday, March 13, 2007

Grilled Chicken Thighs Tandoori and Pita


Back in January I was lucky enough to spend a week in Boulder, CO playing at the Colorado Mahler Festival. One of the best parts of the entire week was eating, and having access to food I would otherwise have to drive two hours to eat. It was heaven; we ate all kinds of food that week and one of our best finds was an Indian lunch buffet. I ate myself silly at that place stuffing as much fresh Naan in my face as I could manage. Then and there I resolved to try to learn at least one good Indian dish.

Since then I've made two Indian curries using two different recipes; one was eh and the other one better, but still nothing to write home about (or write here about). My third attempt came last week from a recipe I found on allrecipes.com, a Tandori Chicken recipe. The cooking method called for outdoor grilling, but since it was blizzarding here last week I cooked it in the oven instead, and it was a hit. Everyone agreed that one of the things that made it taste so good was the smell of the spices on the chicken and in the house.

Grilled Chicken Thighs Tandoori

* 2 (6 ounce) containers plain yogurt
* 2 teaspoons kosher salt
* 1 teaspoon black pepper
* 1/2 teaspoon ground cloves
* 2 tablespoons freshly grated ginger
* 3 cloves garlic, minced
* 4 teaspoons paprika
* 2 teaspoons ground cumin
* 2 teaspoons ground cinnamon
* 2 teaspoons ground coriander
* 16 chicken thighs (I froze half after cooking to eat another time; I also took the skins off and it worked fine)

1. In a medium bowl, stir together yogurt, salt, pepper, cloves, and ginger. Mix in garlic, paprika, cumin, cinnamon, and coriander. Set aside.

2. Rinse chicken under cold water, and pat dry with paper towels. Place chicken in a large resealable plastic bag. Pour yogurt mixture over chicken, press air out of bag, and seal. Turn the bag over several times to distribute marinade. Place bag in a bowl, and refrigerate 8 hours, or overnight, turning bag occasionally.

3. Preheat oven at 350.

4. Remove chicken from bag, and discard marinade. Shake off excess marinade.

5. Place a cooling rack on top of a cookie sheet. Place chicken on the rack and cook about 20 minutes. Turn over, and cook 20 minutes more or until chicken is done.

I should have made Naan, but again that would have required someone to do blizzard duty, so I made home made pita bread instead.

After making this bread several times, I have learned you need to let the dough rise and proof the proper length of time in order for the pita to puff up while they cook. My usual method of "that looks good enough" because I'm hungry and in a hurry doesn't yield very good pitas.

Pita Bread

* 1 1/8 cups warm water
* 3 cups all-purpose flour (I use 1/2 white and 1/2 whole wheat)
* 1 teaspoon salt
* 1 tablespoon vegetable oil
* 1 1/2 teaspoons white sugar
* 1 1/2 teaspoons active dry yeast

1. Dissolve yeast and sugar in the warm water

2. Mix all other ingredients in a large bowl. Add the yeast/water mixture and mix well. Cover the bowl with a piece of plastic wrap and let it rise until almost doubled, about 1 hour.

3. Turn dough onto a lightly floured surface. Gently roll and stretch dough into a 12 inch rope. With a sharp knife, divide dough into 8 pieces. Roll each into a smooth ball. With a rolling pin, roll each ball into a 6 to 7 inch circle. Set aside on a lightly floured countertop. cover with a towel. Let pitas rise about 30 minutes until slightly puffy.

4. Preheat oven to 500 degrees F. If you have one, cook the pitas on a pizza stone in the oven, 3 at a time. If not, place 2 or 3 pitas on a wire cake rack. Place cake rack directly on oven rack. Bake pitas 4 to 5 minutes until puffed and tops begin to brown. Remove from oven and immediately place pitas in a sealed brown paper bag or cover them with a damp kitchen towel until soft. Once pitas a softened, either cut in half or split top edge for half or whole pitas. They can be stored in a plastic bag in the refrigerator for several days or in the freezer for 1 or 2 months.

Monday, March 12, 2007

Cardamom

The best part of the great school bread experiment (see previous blog entry) is the discovery of a wonderful spice called Cardamom. I had never cooked with this spice before and had to drive to a supermarket an hour away to find it, but it was worth it. What a heavenly scent! Smelling it for the first time simultaneously conjured up images of holidays, travel, and exotic treats. I was so taken in by the spice I did a quick search to find out more about it. A member of the ginger family, cardamom is used medicinally and as a common spice in Indian cooking and Scandinavian baking. It is also used as a flavoring for Turkish coffee, and Tai Chi tea.

If you are interested in reading a food blog that gives information about the cuisine and ingredients in posted recipes (this is probably a one shot deal for me) you may want to check out Joelens's Culinary Adventures.

Friday, March 9, 2007

School Bread: I II and III


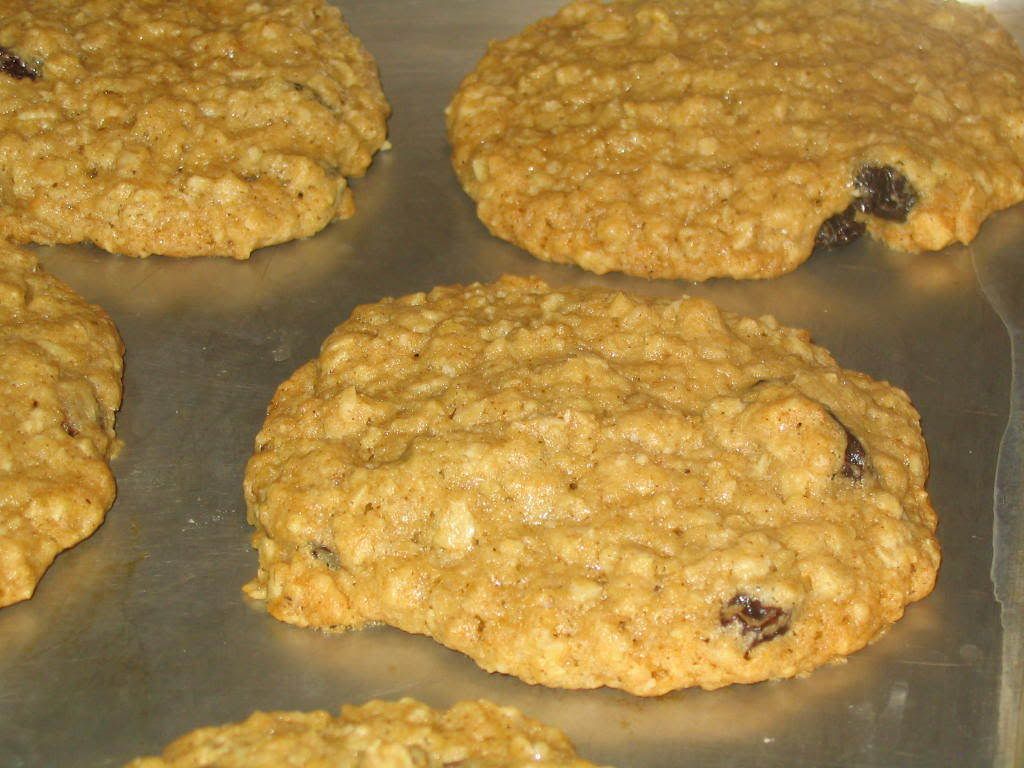
Have you ever been to Epcot in Orlando? If you've been there hopefully you were lucky enough to wander into a tiny bakery in "Norway" and purchase a wonderful concoction called school bread. Normally I don't go for a dessert if it doesn't have at least a some chocolate in it, but I made a big exception for this school bread. A doughnutty/pastry type thing filled with custard, glazed on top, and covered in coconut; it was so fantastic that I have not been able to forget it and I made it my mission to somehow find the recipe and try to make it.

School Bread Part I

A google search for school bread instantly found me the actual recipe used by that bakery in Epcot. Score! Uh, wait a minute...a lot of the measurements are in ounces. Ok, no problem--I'll just borrow the very fancy and expensive kitchen scale my friend Lois has.

So, I set about weighing my sugar, flour, yeast, etc. and notice: wow, that's an awful lot of yeast. Well, maybe that's what makes the bread part so fluffy (have I mentioned I know very little to nothing about baking?). This ended up being problem #1 as I would soon find out. I then converted everything to measurements to expidite the baking process for next time, thinking myself quite clever, and set to mixing everything. The first step called to mix all dry ingredients, and then heat the water and butter to 95 degrees. Not having an instant thermometer, I had to guess what 95 degrees is and apparently I have no idea what 95 degrees is because as I poured the liquid in, I thought it started to cook the egg. I realize after doing it again that this was probably not the case (not sure what those little yellow lumpy things were) but at the time I thought I really screwed up. So, I went to the store and started over.

School Bread part II

Not one to let one mistake derail my plan to eat school bread, I started all over again careful not to heat the water/butter too much. I get it all in the mixer only to find it's WAY too sticky/soupy--
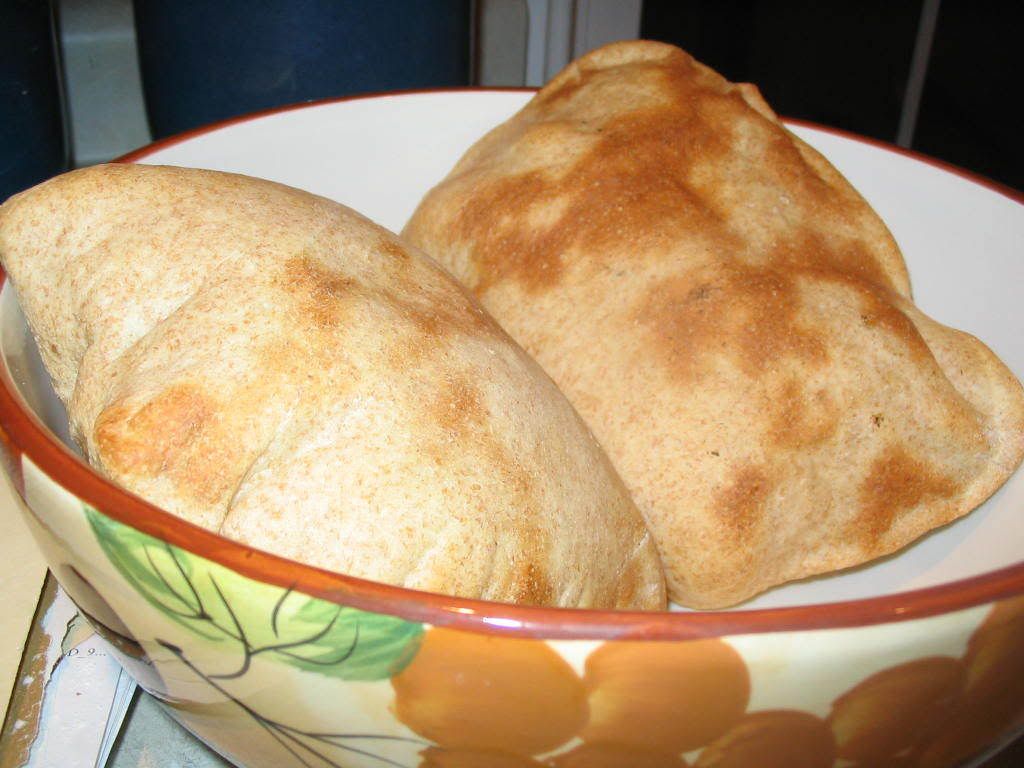
problem #2. Now, remember I said I know next to nothing about baking. However, I have made enough pizza dough to know there is no way that dough was going to roll out properly...so I added a little flour. It was still sticky and wet--so I added some more. This went on and on until I was wailing out loud to no one in particular "why is this so wet?!!!??!" still adding more flour. After adding 4 extra cups of flour I finally gave up and put it in a big bowl to rise, because it was already starting to get a lot bigger than I expected. An hour later it looked like it was ready to take over the neighborhood--why is it so big and still sticky? Oh well, forge on I thought, and I did, only to end up with something that resembled bland, dry dinner rolls. After I tasted the first batch it all went into the garbage.

School Bread part III

I was exhausted at this point, but also pretty pissed off that I could not figure out where I had gone wrong. Plus, I had made the custard filling which tasted fine, so all I needed was the stupid bread to put it in. I decided to start again at the beginning and got back on google to check out other school bread recipes. I finally found the same recipe on another site and lo and behold: the recipe I used called for 2 pints of water, but the same recipe posted on another site called for 1. Hooray! Problem #2 solved. I was ready to give it one final shot, and then I remembered: what about the whole yeast thing (problem #1)--maybe you should revisit that one, eh Sherlock Holmes? Good thing I did because...ok, I have no idea how it happened but I put in, like, 3x's the yeast it called for. Obviously I weighed it wrong and shudder to think just how much yeast went into those first 2 batches. Anyway, to make a long story short (yah, I know: too late) I made my 3rd batch of school bread. The dough was still (in my opinion) too sticky; I had to keep spraying my hands with cooking spray to handle the dough, but I guess third time's the charm, because they turned out fine


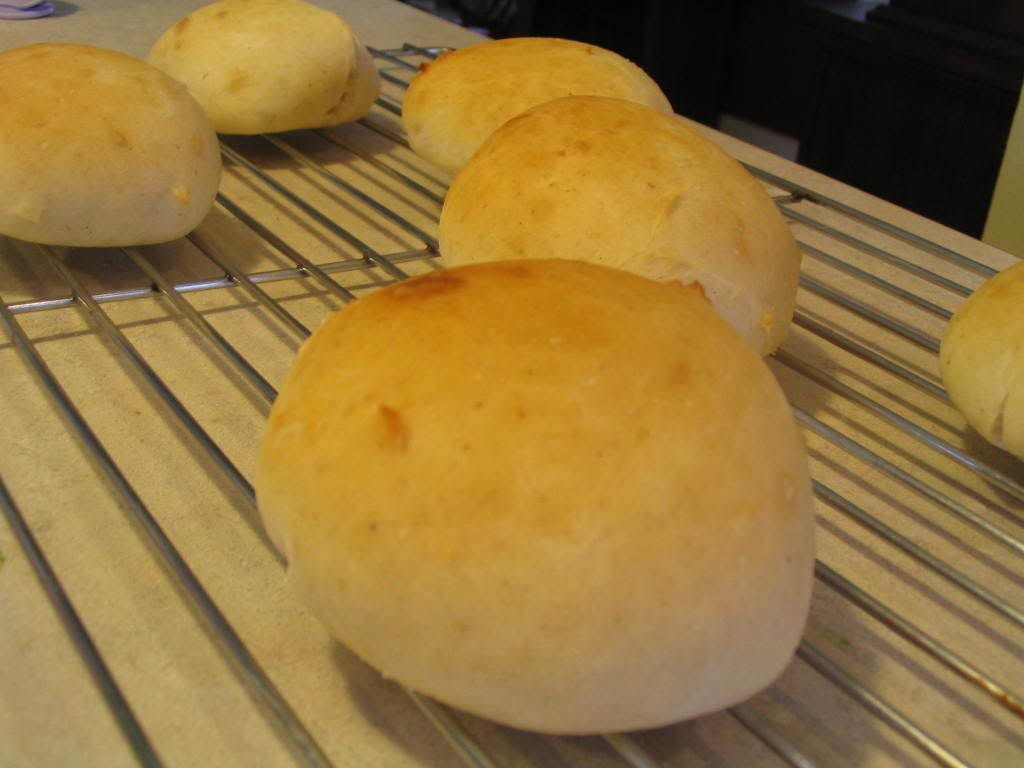
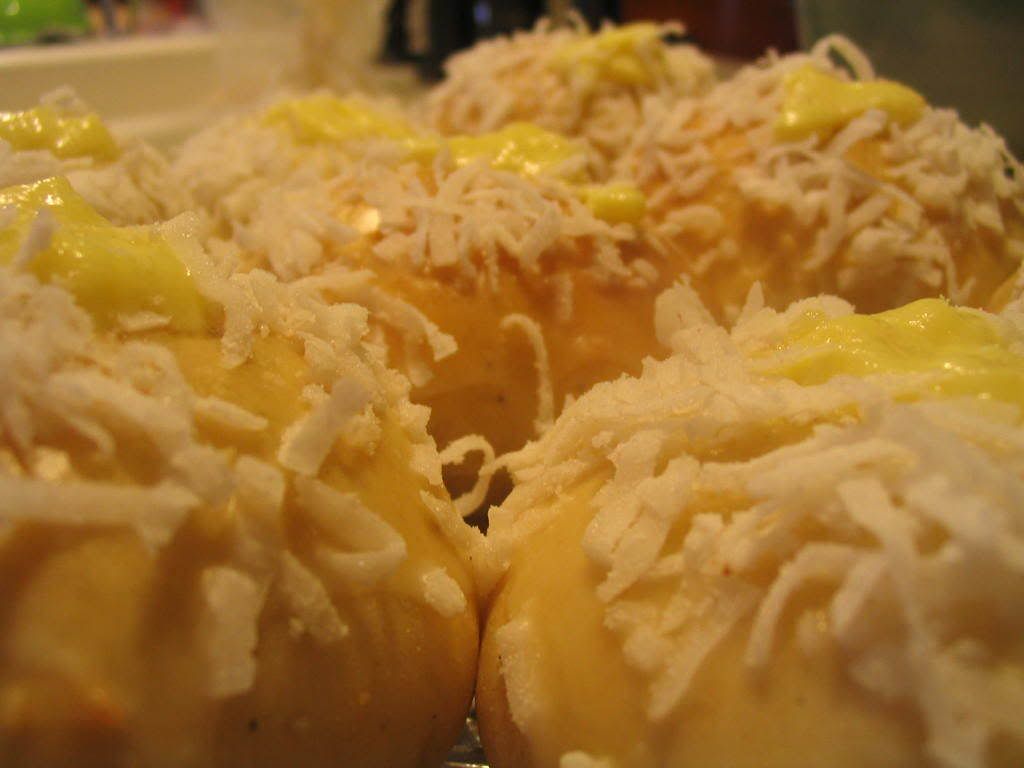
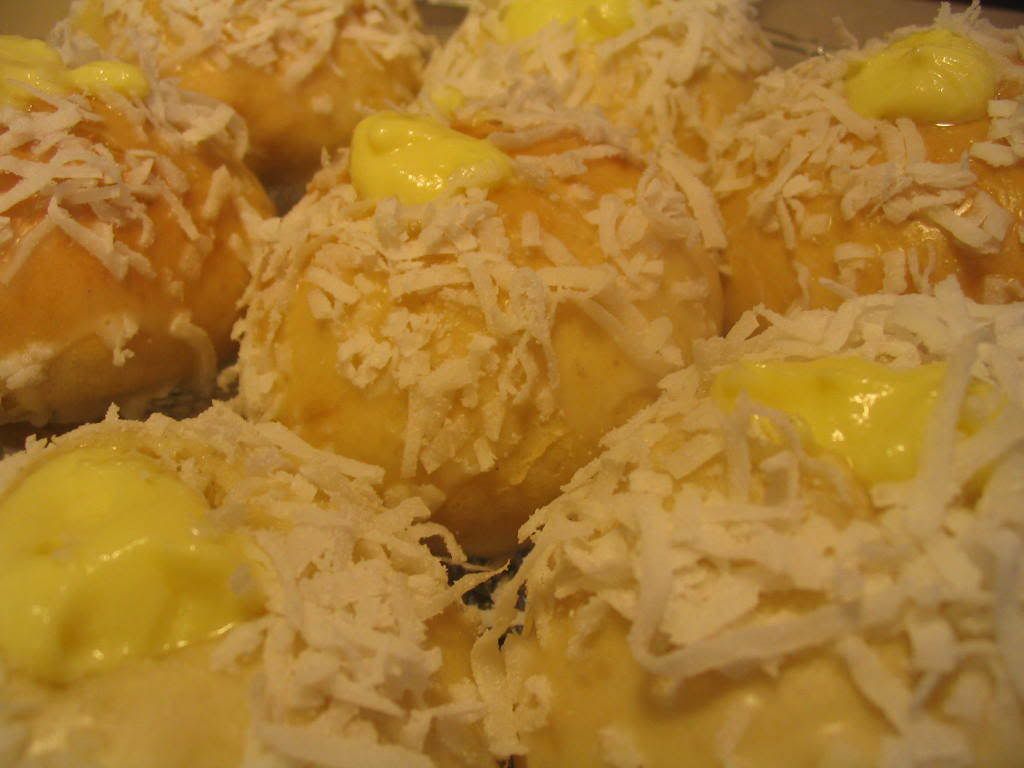
They are still a lot 'breadier' than I remember from the Epcot ones, but they had a wonderful sweet taste. I then finished them off with the custard filling, icing and coconut


School Bread final assessment
As is the case with most things you eat somewhere else and try to recreate, my school bread just wasn't the same; good, but just not the same. Maybe eating it in a fake Norway is what makes it taste so over the top good. Here is another recipe for School Bread I found on the blog Bubbling Cauldron that looks similiar to the one I used, but better; it uses 1/2 cup less liquid for the bread so the dough is probably just right and not sticky. Next time, this is the one I'm going to try.

Skolebrød

1 (.25 ounce) package active dry yeast
1 1/2 cups warm milk
1/3 cup butter, melted
4 cups whole wheat flour
1/2 cup sugar
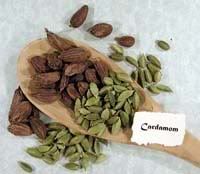
2 teaspoons ground cardamom
1 egg, beaten

Powder Sugar Glaze

1 cup sifted powdered sugar
2 tablespoons milk or water
1/2 teaspoon vanilla
coconut

Pastry Cream

3 egg yolks
1/4 cup sugar
2 1/2 tablespoons cornstarch
1 cup milk
1 drop vanilla extract
3 tablespoons unsalted butter

In a large bowl, dissolve yeast in warm milk. Add melted butter, 2 cups whole wheat flour, 1/2 cup sugar and cardamom.
Stir in the remaining flour, 1/2 cup at a time, beating well after each addition.
When the dough has pulled together, turn it out onto a lightly floured surface and knead until shiny and pliable.
Lightly oil a large bowl, place the dough in the bowl and turn to coat with oil.
Cover with a damp cloth and let rise in a warm place until doubled in volume, about 1 hour.
Divide the dough into twenty four equal pieces and form into rounds.
Place the rounds on to lightly greased baking sheets.
Cover the rolls with a damp cloth and let rise until doubled in volume, about 20 minutes.
Meanwhile, preheat oven to 475 degrees F (245 degrees C).
Brush risen rolls with beaten egg. Bake in preheated oven for 8 to 10 minutes until nicely browned with pale sides.
Cool completely on wire racks. Spread glaze across top and then dip in coconut.

To make pastry cream: In a mixing bowl, whisk together the egg yolks, sugar, and cornstarch until well combined.
Whisk in 2 tablespoons of milk. Place the remaining milk and the vanilla in a medium saucepan.
Bring the milk to a boil and whisk it into the yolk mixture.
Pour the mixture into the saucepan and bring it to a boil over medium heat, whisking constantly.
Remove from the heat and whisk in the butter.
Line a baking sheet with plastic wrap and spread the pastry cream over the plastic to cool it as quickly as possible.
Cover with plastic wrap and refrigerate it until cold.
Place the cooled pastry cream into a pastry bag and fill the buns with cream.

Makes 24 servings

optional fillings, vanilla pudding, french pastry cream

Monday, March 5, 2007

Hot link

If you have somehow missed it, you must read Anthony Bourdain's musings on the food network chefs posted on Michael Ruhlman's blog. His rantings on Sandra Lee in particular are priceless.

Friday, March 2, 2007

3 in 1 Meatballs

 
Posted by Picasa


You know the old saying 'make hay while the sun shines'? Well, my motto is 'cook as much and as fast as you can while the boy is not screaming and crying'. If it's a good day and there are no meltdowns on the horizon, I'll ofen try to cook several meals at once, like a squirrel storing nuts for the winter.

Two weeks ago I decided to make Italian Wedding Soup (thanks Giada) I didn't notice it until I was ready to cook, but the recipe only calls for 1/2lb of ground beef and 1/2 lb of ground pork. What to do with the rest of the beef and pork? Aha! In a fit of inspiration I decided to double the recipe for the meatballs that go in the soup, take the other half of the meat and make regular sized meatballs to be frozen and used at a later date.

Last night was that later date, and I made my favorite comfort food--spaghetti and meatballs. As a bonus, there were enough meatballs left over to have meatball subs today for lunch (notice a trend?) Luckily that should use up the rest of them, because I think we'll be all balled out at that point.

Here is the recipe for both the soup and the extra meatballs:

Meatballs:
1 large onion, grated
2/3 cup chopped fresh Italian parsley
2 large eggs
2 teaspoons minced garlic
2 teaspoons salt (I personally didn't double the salt)
2 slices fresh white bread, crust trimmed, bread torn into small pieces
1 cup grated Parmesan
1 lb ground beef
1 lb ground pork
Freshly ground black pepper

Soup:
12 cups low-sodium chicken broth
1 pound curly endive, coarsely chopped (1 pound of escarole would be a good substitution)
2 large eggs
2 tablespoon freshly grated Parmesan, plus extra for garnish
Salt and freshly ground black pepper

To make the meatballs: Stir the first 6 ingredients in a large bowl to blend. Stir in the cheese, beef and pork. Divide the mixture in half.

To make the soup meatballs: using 1 1/2 teaspoons for each, shape the meat mixture into 1-inch-diameter meatballs. Place on a baking sheet.

To make large meatballs: using the other half of the mixture, divide into approx. 12-15 larger meatballs. Heat approx. 4-5 T of olive oil in a pan over med. heat (I use a free standing skillet and set it at 350). Fry the meatballs until they are lightly browned all over, turning several times while cooking. Do not over brown or the outside will get tough. Take out of pan and drain on paper towels--they will still be slightly underdone and pink inside. Finish cooking them by placing in a pot of spaghetti sauce over medium heat for about 15 minutes or until no longer pink inside. This can either be done immediately, or at a later date after the meatballs have been frozen and then defrosted.

Meatball subs:
If you have any meatballs and sauce left over, heat them up in the microwave or in a pot over medium heat. After warmed, place the meatballs and sauce on an Italian roll/sub roll/hoagie roll and place on a baking sheet seem side down with the meatballs facing straight up. Sprinkle shredded mozzarealla cheese on top and place in the oven with the broiler on low. Watch carefully and toast for 2-3 minutes until the cheese is melted and bubbly and the bread is slightly toasted.

To make the soup: Bring the broth to a boil in a large pot over medium-high heat. Add the meatballs and curly endive and simmer until the meatballs are cooked through and the curly endive is tender, about 8 minutes. Whisk the eggs and cheese in a medium bowl to blend. Stir the soup in a circular motion. Gradually drizzle the egg mixture into the moving broth, stirring gently with a fork to form thin stands of egg, about 1 minute. Season the soup to taste with salt and pepper.

Ladle the soup into bowls and serve. Finish soup with parmesan cheese if desired.

Monday, February 26, 2007

Eclair Cake

Photobucket - Video and Image Hosting

Fancy desserts that take tons of work and preparation and require exquisite presentation are fun to do for certain occasions such as birthdays, a special dinner party, or if say, the pope should decide to stop by for a visit. Otherwise, I'm all about the dessert that is easy and tastes good, even if it doesn't look like anything special sitting in its very un-fancy square baking dish. Sometimes, you just need something that tastes good to shove in your pie hole, especially if you're feeding a crowd, and this fits the bill. Bonus: it's so easy to make that even the most baking challenged person could handle it.

I found this recipe on allrecipes.com and only made one modification. It originally calls for chocolate icing on top which I thought sounded rather disgusting. Instead, I topped off the dessert with a chocolate ganache which was, in my opinion, the better option.

Eclair Cake

2 pkg. instant vanilla pudding
1 (8 oz) container frozen whipped topping, thawed
3 C milk
1 (16 oz) pkg. graham cracker squares

Ganache

9 oz chocolate (I tried both bittersweet and milk, and the milk chocolate worked better)
1 C heavy cream

To make the cake:

1. Throughly mix pudding, whipped topping and milk together in a bowl.

2. Arrange a single layer of graham crackers in the bottom of a 13x9 baking pan. Evenly spread half of the pudding mixture over the crackers. Top with another layer of crackers and the remaining pudding. Top with a final layer of graham crackers.

3. Top with chocolate ganache. Cover and chill at least 4 hours before serving.

To make the ganache:

1. Place the chocolate in a medium bowl. Place the cream in a sauce pan and bring just to a boil, watching very carefully because if it boils for a few seconds, it will boil out of the pot. When the cream has come to a boil, pour over the chopped chocolate, and whisk until smooth. Allow to cool slightly before pouring over the cake.

Bowlin' bowlin' bowlin'

Photobucket - Video and Image Hosting

It's funny how the simplest things in life can sometimes give you such great pleasure. I'm always amazed when a small, seemingly insignificant thing can do that, such as these bowls. Silly I know, but I just love these stupid things. My husband had a mid size bowl made out of this thick, sturdy plastic that had been his grandmother's that I almost got rid of when we got married (along with his organge recliner and 1960s era couch with big brown flowers). Luckily I realized just how handy it was and kept it; it's sturdy but not heavy, and as far as I can tell, unbreakable. When I found this set of festively bright bowls made of the same thick plastic, I snapped them up and immediately banished my set of glass bowls to the basement. There is a bowl just the right size for every job and they are bright and happy to boot. What's not to love?

Thursday, February 22, 2007

Shrimp Cakes

Photobucket - Video and Image Hosting

A friend once said he makes it a rule to never order seafood unless he can look outside the restaurant and see water. He is a wise and prudent person. I, however, show no such restraint and will eat seafood (particularly shellfish) any time, any place in large quantities. I know better, but I just can't help myself.

I needed to use up a pound of already cooked shrimp and made this shrimp cakes recipe from Cooking Light magazine. I made some adjustments so it can no longer be considered 'light', but they taste great and aren't that bad in the grand scheme of things. The lime crema sauce is from a shrimp tacos recipe and it's to DIE for. Do not serve these shrimp cakes without it or you will be sorry. The picture doesn't do them justice, but I have since busted out the camera directions and will hopefully take better pictures in the future.

Spicy Shrimp Cakes

1 lb shrimp peeled, deveined, and boiled until pink
1/2 C finely chopped jared roasted red peppers
1 minced garlic clove
1/4 C thinly sliced green onions
3 T reduced-fat mayo
1 T fresh lime juice
1 1/2 tsp. hot sauce
1/2 tsp. sugar
1/4 tsp. salt
1 large egg
1/4 C finely chopped cilantro
1 C panko (Japanese breadcrumbs) divided


Lime Crema

1/4 C sliced green onions
1/4 C chopped cilantro
3 T light mayo
3 T fat free sour cream (I used low fat)
1 tsp lime zest
1 1/2 tsp lime juice
1 garlic clove


To prepare cakes:
1. Place shrimp in a food processor; pulse until finely chopped.

2. In a bowl mix the first 10 ingredients (through egg) and stir well. Add in cilantro and 1/2 the panko.

3. Divide shrimp mixture into 6-10 portions, depending how large you want the cakes (I made 6). They should be about 1/2 inch thick each. Dredge both sides of patties in the remaining 1/2 C of panko. Chill at least 1 hour.

4. Heat a non stick skillet over medium heat. Add 4 T of olive oil. Cook each patty on both sides, about 4 minutes each or until browned. Place on paper towels and keep warm.

5. Place two patties on top of a bed of mixed greens dressed and tossed with honey mustard vinegrette. Place a dollop of lime crema on top of each cake and serve.

Forced DIY

So what happens when you move to the middle of the middle of nowhere and you can no longer buy things like fresh bagels, coffee ice cream, fresh mozzarella, or even decent fresh produce? What do you do when 'going out to eat' means either the local Mc Donald's or a church 'spaghetti feed'? Well, you only have two choices: you can either drink the proverbial cool aid and make a lot of meals whose main ingredient is cream of-something-or-other soup; or, you can fight, fight, fight. Do not go gentle into the night but go kicking and screaming and as you do, try to learn how to make all that wonderful food you miss so much, yourself.

Thus, I became very interested in cooking. I am not a gourmet by any means. I will not be making food with 'essence' of anything or with a side of foam. I use measuring cups and spoons (gasp!) and the majority of the time use a recipe. However, the more I cook the more I learn, and try to improve upon what has already been done before. This in itself is a challenge, but the real test comes in trying to make these non-completely boxed, canned or frozen meals while tending to my 18 month old son as I cook. Now THAT is something I'd like to see on iron chef. Sure those guys can cook, but how would they do if you set loose a few toddlers in their kitchen? Can you still manage to cook 20 different dishes using pumpkin as the secret ingredient with a hungry 1 year old climbing up your leg yelling "CHEESE! CHEESE! JUICE!!!"? How would they do running back and forth tending to their creations if they had to watch out for the minefield of toys, pots, pans, and plastic containers laid out on the floor by said toddler? Yah, I'm still waiting to see that challenge take place.

So, this will be my place to document my quest to find recipes that are not only good, but have a good effort/taste ratio. My time is limited and precious; a recipe that is time consuming better have the taste to back it up, or it goes in the garbage never to be tried again.